Barrel Chambering 101
How Does Barrel Chambering Work?
In order for rifle, pistol, and shotgun barrels to feed, extract, and shoot properly, the barrel requires a finish machining operation called chambering. The chambering operation is a critical step in the barrel manufacturing process that enables the cartridge to effectively seat, expand under pressure, and then contract slightly as part of the cycling operation.
The chamber is positioned on the breech end of the barrel, opposite of the muzzle. Consistency in dimensional tolerances within the chamber (as well as perfect alignment with the bore) are essential in determining a barrel’s accuracy potential.
MACHINES FOR CHAMBERING
Machine selection for chambering largely depends on the volume of production required. Within this guide we’ll highlight a number of best practice recommendations, as well as a few pros and cons of chambering barrels with manual and CNC lathes.
Chambering with Manual Lathes
When chambering with a manual lathe, the gunsmith will put a chamber reamer tool in the turret or tailstock and feed the tool into the chucked barrel. The gunsmith trams a 4-jaw chuck so the concentricity of the barrel runs true to the chamber reamer. Sometimes an indicator is used to feed to a specific depth, or the gunsmith checks headspace periodically with a caliber specific headspace gauge. Chips are flushed manually by retracting the chamber reamer out of the barrel frequently, blowing them off with air or low pressure cutting fluid. When chambering with both a manual or CNC lathe, the barrel is rotating while the tool is stationary.
Benefits to Chambering with a Manual Lathe:
More often than not, gunsmiths who are running one-off custom barrels or low volume production orders will generally gravitate toward manual lathes. Setup operations are typically simpler, allowing for quicker tooling changes and flexibility between pieces.
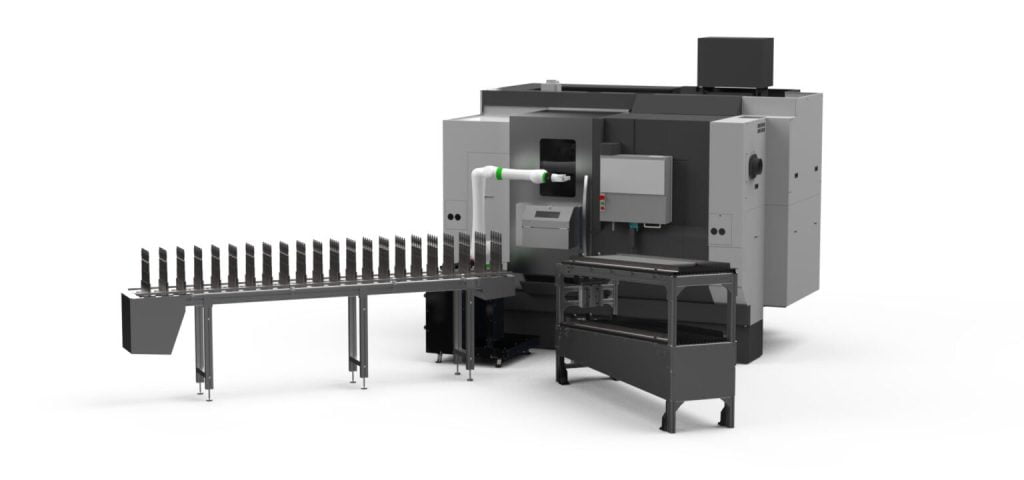
The process of chambering with a CNC lathe is quite different from its manual counterpart. Instead of tramming every barrel, machinists use a floating tool holder to compensate for slight bore to tool misalignment. This enables the manufacturer to run barrels at a much faster production rate and introduce robotic machine tending.
Chip evacuation is very important during the chambering process. Manufacturers can either flush the barrel with coolant through the lathe spindle or, in some circumstances, coolant can be introduced around the tool. If a machine is solely dedicated to chambering, it’s advantageous to use cutting oil. If the machine performs other operations like profiling or machining, it’s best to use a water-based cutting fluid (emulsion).
Machine alignment is essential. As mentioned above, a floating tool holder can be used so that any misalignment between tool and barrel centerline is accounted for. Another way to chamber with a well aligned machine is to mount the chamber reamer rigid in a collet. This setup often delivers an improved chamber finish.
It is extremely important that the concentricity of the barrel bore to outside diameter is held very tight which is done in upstream turning operations. It’s also important that the tool holder and turret move to the true centerline of the barrel. The perpendicularity, angularity, concentricity and general alignment of the machine is very important. If the chamber is machined at an angle, the round will not seat correctly, adversely affecting accuracy. The rear portion of the chamber (chamber body) where the case sits will also be oversized.
Benefits to Chambering with a CNC Lathe:
If all these conditions are met and the machine is set up well, a high production CNC lathe will produce a better and more consistent chamber than the manual lathe process. This is of the reasons why CNC lathes are generally preferred for volume production. Barrel numbers 500 through 1000 are going to be far more consistent in fit in finish.
TOOL DESIGN
Reamer Pilots
It is a common best practice to have some sort of guide (called a pilot) to direct and support the forward facing side of the reamer. There are two ways to size these bushings to accommodate different chamber specifications:
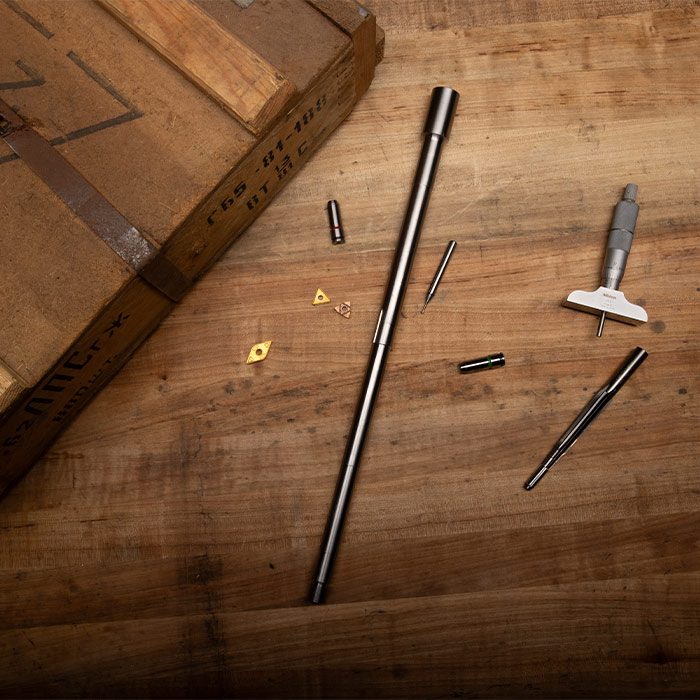
Integrated Pilots: Bushings can be ground on the high speed steel or carbide tool itself. The benefit to having a ground bushing on the tool is that concentricity is going to be perfect. The downside is that you’re stuck with the size that it’s ground at (typically 0.0005in smaller than SAAMI minimum bore diameter).
Interchangeable Bushings: A benefit to interchangeable hardened bushings is that the machinist can swap out the bushing to fit exactly in that particular batch of barrels. Bushing fit is extremely important when trying to achieve perfect concentricity between chamber and rifled bore. It’s typically best to use a bushing only a few tenths (0.0002in – 0.0004in) smaller than the barrel bore.
Reamer Flutes
Chamber reamers can be made with either straight or helical flutes built into their profile. While straight flutes are cheaper to produce, helical flutes serve to eliminate linear chatter. The downside to helical fluting is that the manufacturing and grinding of those tools is more difficult than their straight fluted counterparts. An odd number of flutes is advantageous because vibration and harmonics are partially mitigated. That said, designing reamers with an even number of flutes make the tools easier to manufacture and measure.
Reamer Types
There are two types of reamers that are typically used in a production environment, a rougher and finisher. The rougher is sized smaller than the finisher but does most of the heavy lifting. The finisher will cut the entire profile and set headspace.
Roughers typically have less flutes in order to flush more chips (due to the higher volume of material removed). Both the rougher and finisher have a pilot, but unlike the finisher the rougher doesn’t have features to cut the freebore and throat.
Chambering Reamer Material & Coating
Chamber reamers come in two different material types. High speed steel reamers are typically used for low volume production, one-off work, or final hand reaming. Manufacturers producing barrels at scale will typically use solid carbide reamers.
Coatings can be added to carbide tools to help reduce heat generated from the metal removal process increasing tool life. The reduction in friction between the cutting surface and raw material serves to improve the internal surface finish of the chamber. Tool coatings are typically matched to the material being cut.
BARREL MATERIAL CONSIDERATIONS
As referenced in the Vortakt Barrel Blanks 101 Guide, there are two primary types of material used in the manufacturing of gun barrels (although others do exist).
Chrome Moly Vanadium: Chrome moly (CrMoV) steel is used for military spec manufacturing, and has been adopted as a common standard across the firearm industry. CrMoV tends to button rifle a bit better than 416R stainless steel.
416R Stainless Steel: 400 series stainless steel is chosen for its corrosion resistance, tensile strength, and sometimes, appearance. 416R stainless steel tends to offer a better chambering surface finish than its CrMoV counterpart.
CHAMBER FINISHING
Not all manufacturers and gunsmiths follow the same process when finishing a chamber. There are a number of operations that can be incorporated to deliver a higher quality finish.
Basic: The gunsmith or machinist uses a single high speed steel reamer to cut the chamber.
Good: The machinist uses a single carbide tool to do all the work. Multiple peck cycles take place as the machinist works their way down. Peck cycles support chip flushing, which as mentioned earlier, is essential in producing a good surface finish.
Better: The machinist first has the rougher do most of the work, delivering the final touches with a finish reamer. This serves to extend tool life of the cutting edges on the finish reamer. All barrels produced with this method have a superior finish because the rougher is changed more frequently. An even better solution involves using a twist drill first, feeding it quickly, and then following up with a rougher and finisher. This helps save both the rougher and finish reamers. Although there is an additional tool change, this process results in an overall reduced cycle time.
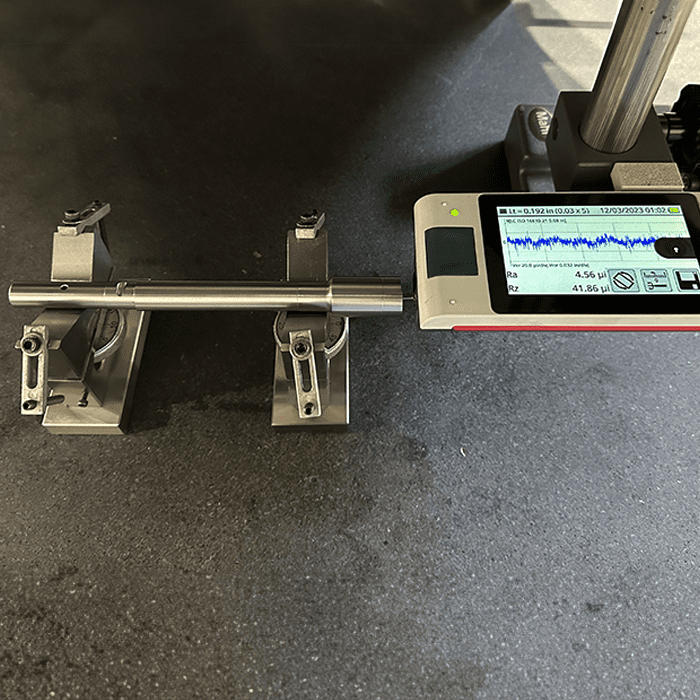
Best: By adding a honing operation to the above workflow, the machinist can improve surface finish by 10-25%. The industry standard for surface finish on a typical barrel is 24 Ra (Roughness Average). If this additional step is done correctly, surface finishes of 16 Ra or better can be achieved.
Cartridge & chamber Features
The profile of a chamber is somewhat complex with tightly held ID and depth features. The most common chamber offerings, especially in the US, follow standards published by the Sporting Arms and Ammunition Manufacturer’s Institute, commonly referred to as SAAMI. Information regarding specific chamber designs can be found in the SAAMI Glossary here. Additional chamber standards are defined by CIP, NATO, or other international organizations.
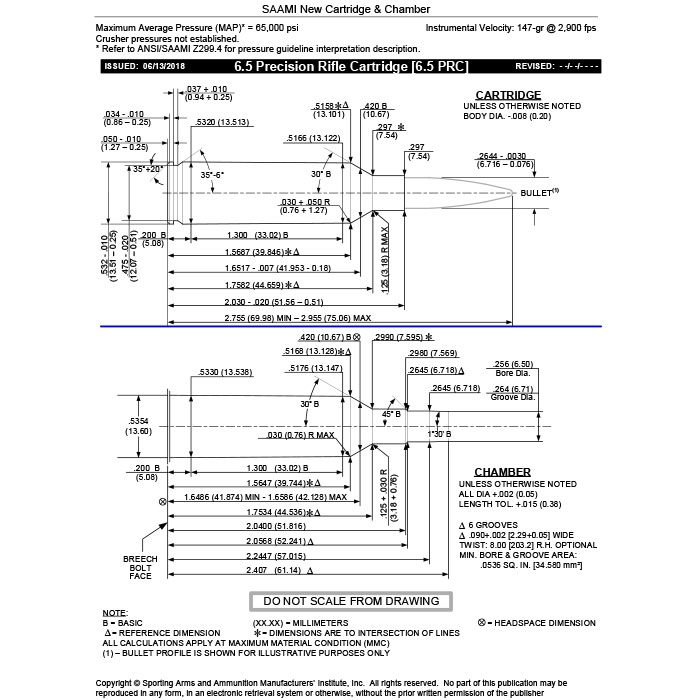
The topmost section of a SAAMI cartridge and chamber drawing features standard cartridge specifications, including the maximum average pressure, instrumental velocity (projectile velocity), cartridge name, and the issue and revision dates (where relevant).
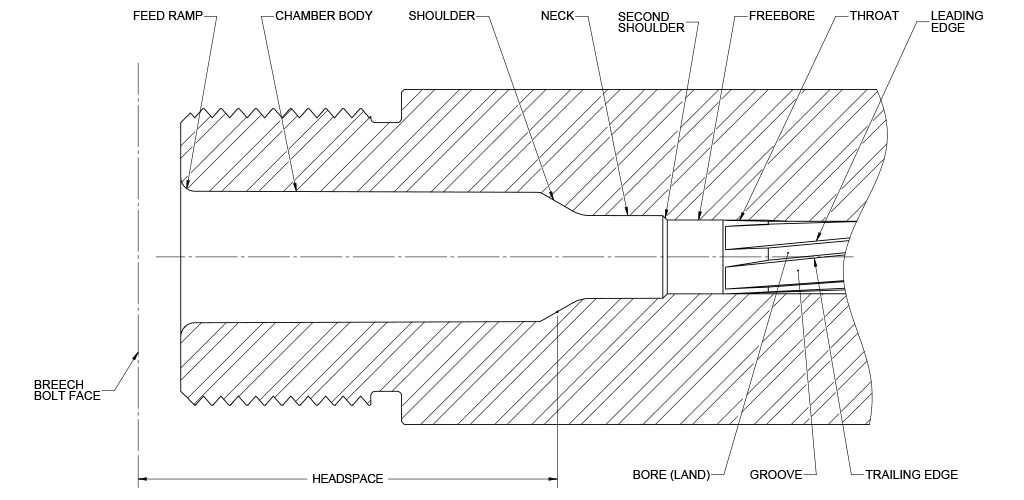
Below this cartridge information are a pair of engineering drawings. The first drawing features the cartridge dimensions, while the bottom image highlights the chamber dimensions.
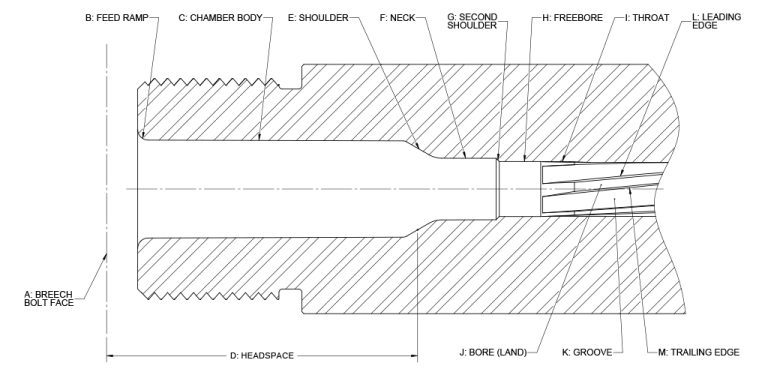
While tolerances and critical dimensions may vary between different chamber designs, there are many features that are relatively standard across a family of cartridges.
A. Breech Bolt Face
B. Feed Ramp
C. Chamber Body
D. Headspace
E. Shoulder
F. Neck
G. Second Shoulder
H. Freebore
I. Throat
J. Bore (Land)
K. Groove
L. Leading Edge
M. Trailing Edge
Headspacing Considerations: For Shoulder, Rimmed, Case Mouth, and Belted Magnum Cartridges
The above SAAMI cartridge and chamber drawings highlight dimensions typical of a shoulder (necked) rifle cartridge. Headspace is the clearance allowed between the base of a fully seated cartridge case and the face of a locked breech face in a firearm. This critical dimension should be checked with each barrel chambered.
There are three variables that may define the headspace of a necked cartridge:
- Bolt Face Recess Depth
- Barrel Breech Face
- Shoulder Depth
If any of these three dimensions fall outside of the headspace tolerances defined in their respective drawing, one of two things may happen:
- If headspace is too short, the cartridge may not go into battery.
- If the headspace is too long, the cartridge could rupture rearward, damaging the firearm and injuring the shooter.
Rimmed, belted, and case mouth cartridges are different from rimless cartridges, in that headspace is measured off the rim, belt, or case wall rather than the shoulder.
Have any other questions regarding chambering?
Due in part to our effective leveraging of Single Setup Solutions (S3 Technologies) in contouring, threading, chambering, and cut/crown operations, we are able to maintain precise relational tolerances that enable consistent pre-fit barrel fitment with manufacturers who are able to maintain tight tolerances with their receivers.
Vortakt supports a variety of SAAMI, proprietary, and wildcat cartridge designs. Common chambering options can be found here, but custom reamers can be designed to match customer specifications.
Feel free to contact our team here, shoot us an email at info@vortakt.com, or give us a call at (262) 345-0888 to get more specifics on Vortakt’s chambering process.
Absolutely! Vortakt produces barrels designed to YOUR specifications. We can leave barrels finish reamed, short chambered, or unchambered based on your engineering drawing.
Yes, custom reamers can designed and used for production batches of barrels.
Vortakt has used throating reamers when a customer wants a standard SAAMI chamber but with a deeper throat. A SAAMI finish reamer is used first followed by a dedicated carbide throating reamer.

